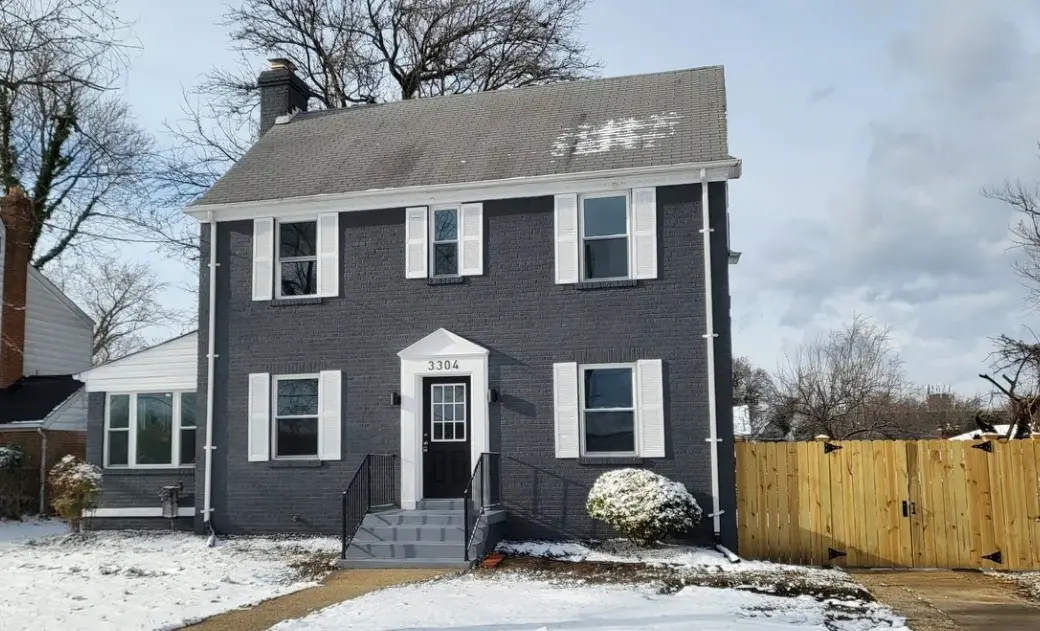
Work Performed In this renovation, rotten wood was replaced, the front door was changed, and the brick was waterproofed. Finally, two final coats of paint were applied. The project took 3 weeks to complete. Main Points of the Work Done Replacement of rotten wood Front door replacement Brick waterproofing Application of two final coats of paint Project completed in 3 weeks AfterBefore Components and Tools Used In this project, high-quality materials were used, including treated wood for replacement, waterproof sealer for the brick, and weather-resistant paint. The tools used included saws, hammers, professional brushes, and rollers. Implementation of the Components The rotten wood was carefully removed and replaced with treated, weather-resistant wood. The front door was replaced with a new one, improving the home’s security and aesthetics. The brick was waterproofed with a specialized sealer, ensuring durability. exterior paint Prince George (6) exterior paint Prince George (5) exterior paint Prince George (4) exterior paint Prince George (19) exterior paint Prince George (11) exterior paint Prince George (8) exterior paint Prince George (9) exterior paint Prince George (10) exterior paint Prince George (16) exterior paint Prince George (17) Load More End of Content. Safety Steps and Devices To ensure a safe and efficient job, these steps were followed: Evaluation and preparation of the work area. Removal and replacement of the rotten wood. Installation of the new front door. Application of the waterproof sealer on the brick. Final painting in two coats. Inspection and quality assurance. The team used safety devices such as helmets, gloves, and protective glasses throughout the process to prevent accidents and ensure a safe working environment.

Comprehensive Bathroom Remodel in Prince George, MD
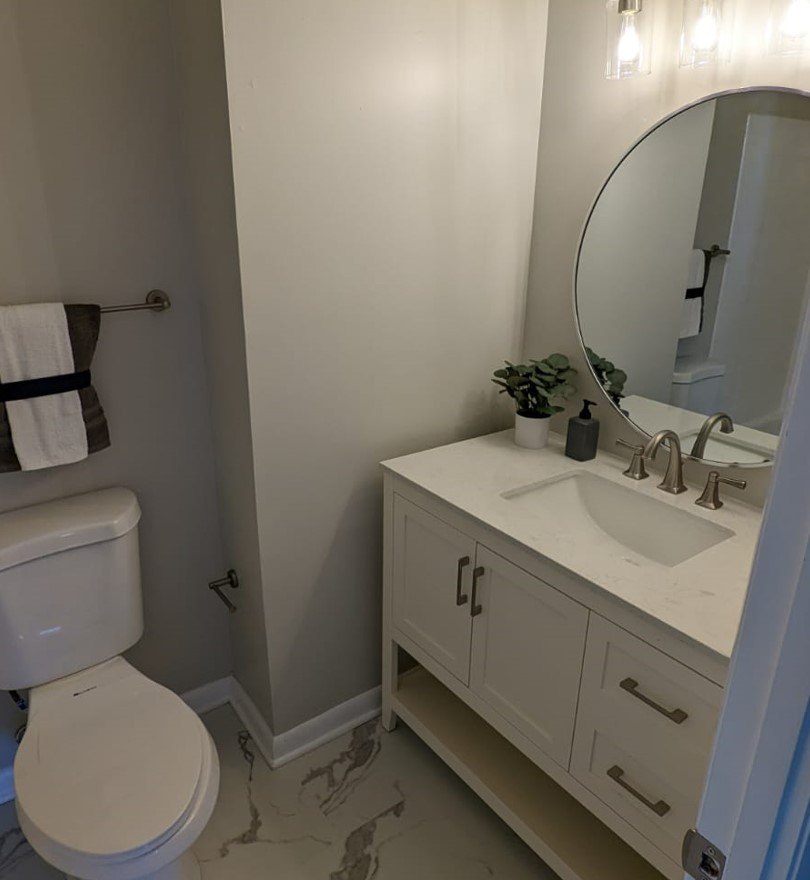
A Brand-New Bathroom for a Fresh Start This bathroom in Prince George, MD, was in dire need of a complete makeover. Damaged pipes and overall wear and tear made it both non-functional and aesthetically outdated. Cacheiro Remodeling took on the challenge of transforming this space into an oasis of comfort and modernity, using top-quality materials and cutting-edge techniques. Work Performed: A Head-to-Toe Transformation Complete demolition and pipe replacement: We completely removed the old bathroom, including the damaged pipes. In their place, we installed Copper and Pex A pipes for hot and cold water, and 3″ PVC for the drain, ensuring optimal water flow and preventing future leaks. Installation of new elements: We replaced the old bathtub with a modern and functional one, and installed new MOEN faucets, a new light fixture, an elegant mirror, an 18″ vanity, and a state-of-the-art toilet. Impeccable finishes and moisture protection: On the shower walls, we installed Durarock and applied Redguard waterproofing, a highly effective moisture barrier. We also installed waterproof LVT flooring, ideal for wet areas. Components and Tools: An Arsenal of Quality for Exceptional Results At Cacheiro Remodeling, we use only the highest quality materials and tools to ensure long-lasting and aesthetically impeccable results. In this project, we used: CPVC and PVC pipes: Durable and corrosion-resistant pipes that guarantee optimal water flow and prevent leaks. MOEN faucets: High-quality faucets with an elegant design that provide comfort and functionality in daily use. Durarock and Redguard: A top-of-the-line waterproofing system that protects shower walls from moisture and prevents mold growth. LVT flooring: Luxury waterproof vinyl flooring that adds style and durability to the bathroom. bathroom Prince George (8) bathroom Prince George (9) bathroom Prince George (10) bathroom Prince George (2) bathroom Prince George (1) bathroom Prince George (5) bathroom Prince George (6) Load More End of Content. Safety First: Prioritizing Your Well-being At Cacheiro Remodeling, safety is our top priority. Throughout the entire remodeling process, we implemented strict safety protocols to protect our workers and you: Personal protective equipment: Our workers wear goggles, gloves, masks, and other personal protective equipment to prevent accidents and ensure a safe working environment. Personal protective equipment: Our workers wear goggles, gloves, masks, and other personal protective equipment to prevent accidents and ensure a safe working environment. Constant supervision: An experienced supervisor closely monitors every step of the project to ensure compliance with safety regulations and the quality of the work. A Renovated Bathroom, a Transformed Home With this comprehensive remodel, this bathroom in Prince George, MD, has become a modern, functional, and aesthetically pleasing space. At Cacheiro Remodeling, we are proud to have transformed this space into an oasis of comfort and well-being for our clients. Dreaming of a New and Improved Bathroom? At Cacheiro Remodeling, we have a team of bathroom remodeling experts with the experience and knowledge to make your dreams come true. Contact us today for a free consultation and get a personalized quote for your project.
Bathroom Remodeling in Silver Spring, MD
Quick Bathroom Transformation in Silver Spring This bathroom remodeling project in Silver Spring, MD, was completed in just four days. The work included installing a new complete vanity with sink and faucet, a new toilet, and renovated floors. Our team ensured every detail was perfect, providing an updated and functional bathroom for our clients. Details of the Work Done A quick yet effective renovation was carried out in this bathroom. The project covered several essential tasks to modernize the space and improve its functionality. Work Description In this project, key elements of the bathroom were replaced to give it a fresh and modern look. A new complete vanity with sink and faucet was installed, the toilet was replaced, and the floors were renovated. The work was done with efficiency and precision, ensuring a high-quality final result. Main Points of the Work Done: Installation of a new complete vanity with sink and faucet. Replacement of the toilet. Renovation of the bathroom floors. Completion of the work in a four-day period. Improvement of the bathroom’s functionality and aesthetics. Use of high-quality materials. Meticulous attention to detail. On-time project delivery. Components and Tools Used For this remodeling project, high-quality components and specialized tools were used to ensure durability and impeccable finishing. AfterBefore Components and Their Implementations The new vanity was chosen for its modern and functional design, including a high-quality sink and faucet. The selected toilet provides efficiency and style, while the new floors were installed to offer durability and a contemporary look. Each component was carefully selected and installed to ensure perfect integration and long-lasting performance. Safety Steps and Devices Our team took several safety measures during the remodeling. They ensured all plumbing connections were correct to prevent leaks. Additionally, they used safe tools and proper installation techniques to minimize any risks during the remodeling process. Attention to detail and safety ensured a smooth job and a safe and reliable final result.
Full Home Renovation in Silver Spring, MD
Comprehensive Restoration to Eliminate Odors and Repair Ceilings and Walls In this house located in Silver Spring, MD, a complete renovation was carried out due to its poor condition, mainly caused by cigarette smoke. The process included priming the entire house, repairing ceilings and walls, and applying specialized paint to eliminate odors. This project, which lasted 5 weeks, transformed the space, restoring its freshness and livability. Work Performed The renovation of this house focused on eliminating the damage caused by cigarette smoke and restoring ceilings and walls. Specialized paint was used to remove the cigarette smell, followed by the application of two final coats on ceilings, walls, and trims. This thorough work ensured the elimination of odors and the recovery of the appearance and quality of the interiors. AfterBefore Main Points of the Work Performed Complete priming of the house Repair of damaged ceilings Repair of affected walls Elimination of cigarette odors Application of specialized paint to remove odors Two final coats of paint on ceilings Two final coats of paint on walls Two final coats of paint on trims Components and Tools Used For this renovation, specialized odor-eliminating paints, putty for ceiling and wall repairs, and tools such as rollers, brushes, sanders, and personal protective equipment were used. Implementation of the Components The specialized paint was applied after the initial priming to ensure the removal of cigarette odors. Ceiling and wall repairs were made using putty and sanding to ensure a smooth surface before painting. Two final coats of paint were applied to ceilings, walls, and trims for a uniform and durable finish. Full Home Renovation in Silver Spring (24) Full Home Renovation in Silver Spring (1) Full Home Renovation in Silver Spring (33) Full Home Renovation in Silver Spring (25) Full Home Renovation in Silver Spring (18) Full Home Renovation in Silver Spring (16) Full Home Renovation in Silver Spring (19) Full Home Renovation in Silver Spring (20) Load More End of Content. Safety Steps and Devices The renovation process followed these detailed steps: Preparation and priming of the entire house. Repair of ceilings and walls. Final inspection and quality assurance. Application of specialized paint to eliminate odors. Two final coats of paint on ceilings, walls, and trims. Throughout the process, safety devices such as helmets, gloves, protective goggles, and masks were used to ensure the safety of the work team and the integrity of the property. This renovation in Silver Spring, MD, has brought life back to a house affected by smoke, ensuring a clean, fresh, and renewed environment for its residents.
Kitchen Remodeling in Silver Spring, MD
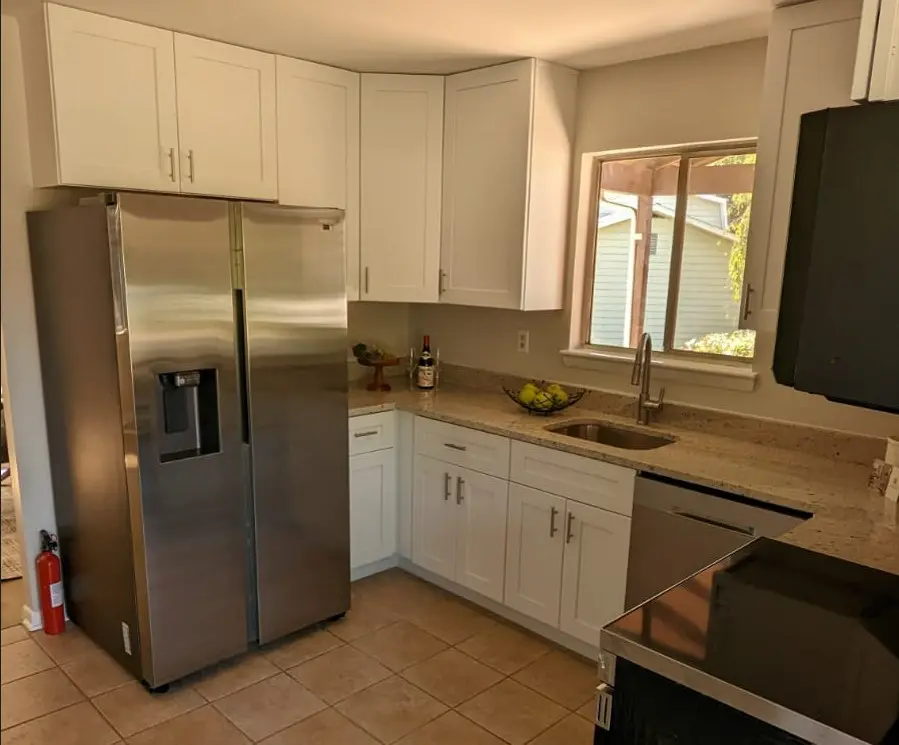
Kitchen Upgrade with New Cabinets, Countertops, and Appliances In this kitchen located in Silver Spring, MD, significant improvements were made focusing on the cabinets, countertops, and appliances, as well as the lighting. This project transformed the space into a modern and functional kitchen, enhancing both the aesthetics and efficiency of the home. Work Completed The remodeling project for this kitchen centered on the renovation of the cabinets, the installation of a new countertop, and the updating of appliances and lighting. The new cabinets provide more efficient storage space, while the new countertop offers a durable and attractive workspace. Modern appliances and improved lighting complete the transformation of this key area in the home. Key Points of the Work Completed Installation of new kitchen cabinets Replacement of the countertop Updating of appliances Improvement of lighting Optimization of storage space Increased efficiency in space usage Enhancement of the kitchen’s overall aesthetics Transformation of the kitchen’s functionality AfterBefore Components and Tools Used For this remodeling, high-quality cabinets, a durable countertop, modern appliances, and efficient lighting systems were used. The tools included saws, drills, screwdrivers, leveling equipment, and personal safety gear. Implementation of the Components The new cabinets were installed to maximize storage space and improve kitchen organization. The countertop was selected for its durability and visual appeal, providing a practical and aesthetic workspace. The modern appliances not only enhance energy efficiency but also improve the usability of the kitchen. The lights were carefully selected and installed to ensure adequate illumination and enhance the overall ambiance of the space. Kitchen in Silver Spring (1) Kitchen in Silver Spring (5) Kitchen in Silver Spring (7) Kitchen in Silver Spring (8) Kitchen in Silver Spring (2) Kitchen in Silver Spring (3) Kitchen in Silver Spring (4) Load More End of Content. Safety Steps and Devices The remodeling process followed these detailed steps: Removal of the old cabinets and countertop. Installation of the new cabinets. Placement of the new countertop. Installation and connection of modern appliances. Updating of the lighting. Final inspection and quality assurance. Throughout the process, safety devices such as helmets, gloves, protective glasses, and masks were used to ensure the safety of the work team and the integrity of the home. This remodeling in Silver Spring, MD, has resulted in a completely renovated kitchen, ready to be the heart of the home, combining functionality, efficiency, and modern design.
Interior Painting Services in a Remodeled House
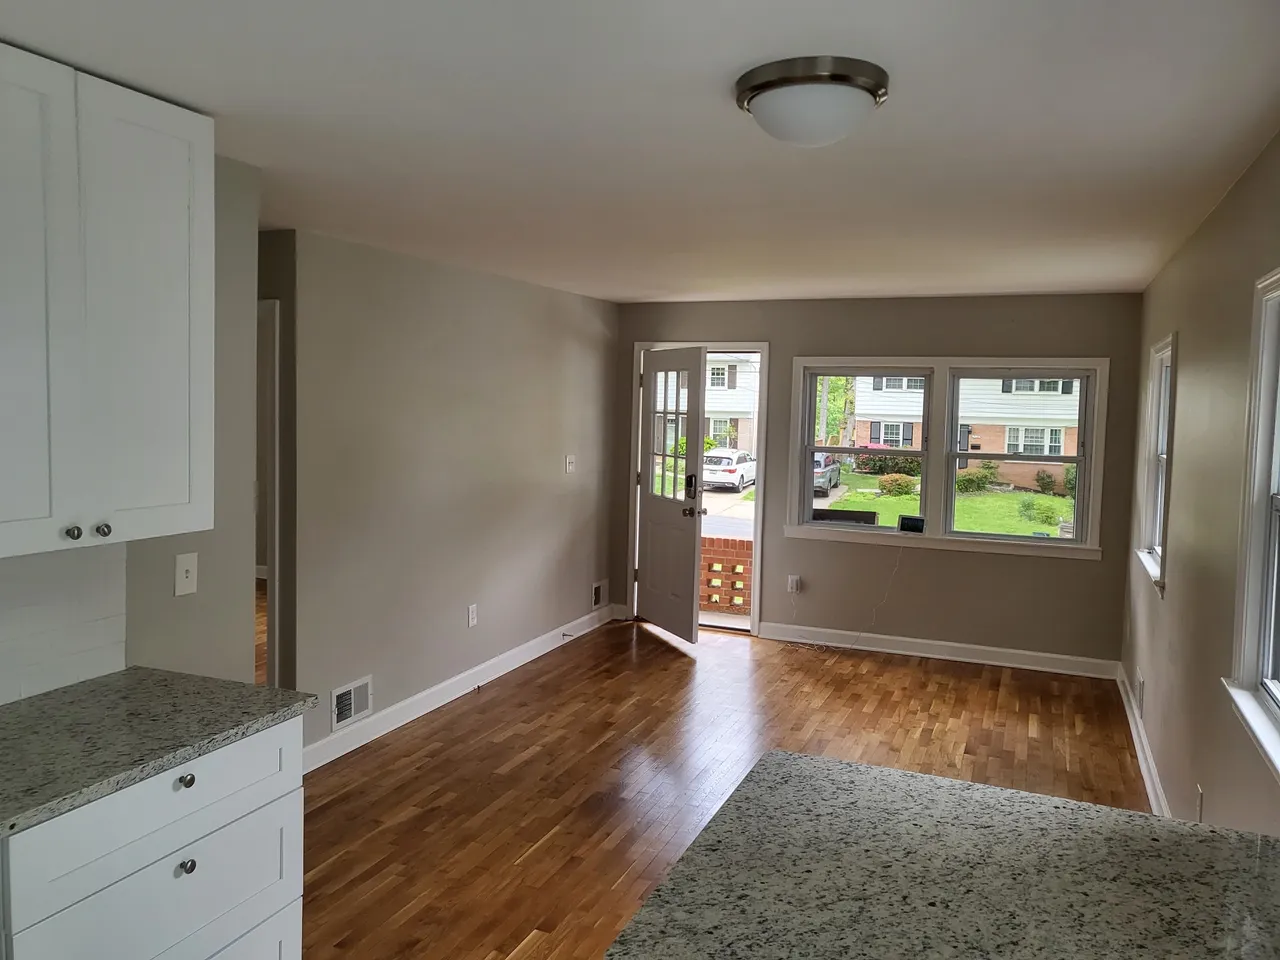
Work Completed In this remodeling project, wood panels were removed from a room and replaced with drywall. New trim was installed, and the entire house was primed. The ceilings were painted with flat latex, while the walls were repaired and painted with flat latex, except for the bathrooms and kitchen. The baseboards were painted in white semi-gloss. The job took 4 weeks to complete. Key Points of the Work Completed Removal of wood panels in a room Installation of drywall Placement of new trim Priming the entire house Painting ceilings with flat latex Repairing and painting walls with flat latex. Painting baseboards in white semi-gloss Project duration: 4 weeks AfterBefore Components and Tools Used High-quality components such as drywall, new trim, primer, flat latex paint for ceilings and walls, and semi-gloss paint for baseboards were used for this project. Tools included saws, hammers, professional rollers and brushes, sanders, and personal protective equipment. Implementation of the Components The wood panels were carefully removed and replaced with drywall, providing a more modern and clean finish. New trim was installed for an additional decorative touch. The entire house was primed to ensure proper paint adhesion. Ceilings and walls were painted with flat latex, achieving a uniform and high-quality finish, while the baseboards were painted in white semi-gloss for an elegant touch. Interior Painting Services (35) Interior Painting Services (12) Interior Painting Services (3) Interior Painting Services (4) Interior Painting Services (39) Interior Painting Services (9) Interior Painting Services (36) Interior Painting Services (37) Load More End of Content. Safety Steps and Devices To ensure a safe and efficient job, the following steps were followed: Preparing the work area and removing wood panels. Installing drywall and new trim. Priming all surfaces. Painting ceilings with flat latex. Repairing and painting walls with flat latex. Painting baseboards in white semi-gloss. Final inspection and quality assurance. Throughout the process, the team used safety devices such as helmets, gloves, protective goggles, and masks to prevent accidents and ensure a safe work environment.
Comprehensive Exterior Home Renovation and Painting in Rockville, MD
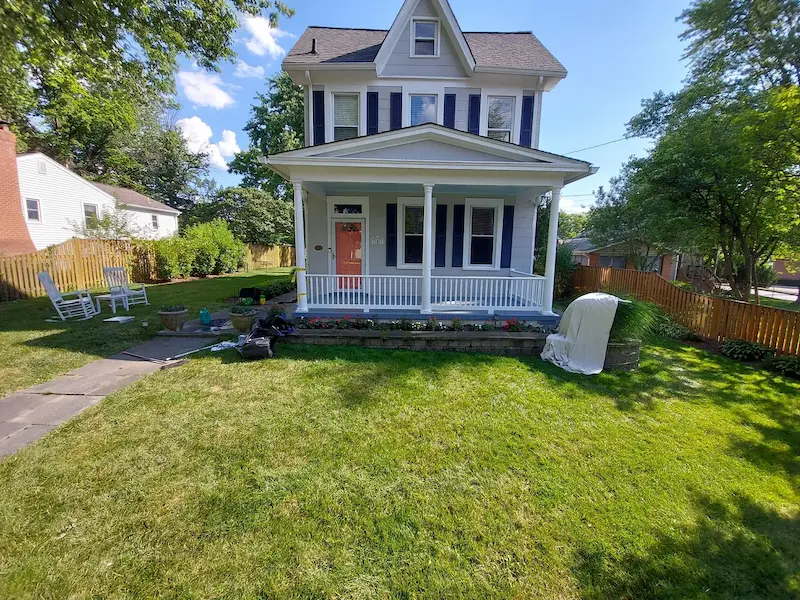
We repair and paint exteriors to ensure durability and impeccable aesthetics in every project. Repair and Painting of a House in Rockville, MD In this house, a considerable amount of rotten wood was repaired, the siding, shutters, and doors were painted. The house was completely primed and two coats of paint were applied. The work took three weeks and the biggest challenge was finding parts of the damaged siding, as it is no longer manufactured, but it was finally found. Main Points of the Work Done: Repair of rotten wood. Painting of siding, shutters, and doors. Application of primer and two coats of paint. Work completed in three weeks. Sourcing out-of-production siding. AfterBefore Components and Tools Used For this project, high-quality materials such as specialized primer and long-lasting paint were used. The tools included high-precision brushes, rollers, and safety equipment for working at heights. The new materials were acquired after an exhaustive search to ensure their compatibility and durability. paiting house rackville white (3) paiting house rackville white (13) paiting house rackville white (14) paiting house rackville white (12) paiting house rackville white (10) paiting house rackville white (8) paiting house rackville white (4) Load More End of Content. Implementation of Components The repair of rotten wood involved the use of special sealants and reinforcements to ensure stability. The primer was meticulously applied to prepare the surface, followed by two coats of high-quality paint for optimal protection and appearance. Every component, from brushes to paint, was selected to ensure a durable and weather-resistant finish. Safety Steps and Devices The work began with the removal of rotten wood and the preparation of surfaces. Safety devices such as harnesses and scaffolding were used to work safely at heights. The primer and paint were applied following strict protocols to ensure even and long-lasting coverage. Finally, quality inspections were carried out to ensure that all components met the established safety and durability standards.

Exterior Painting and Remodeling Services in Rockville, MD
We transform home exteriors, ensuring durability and a flawless aesthetic with our specialized painting and remodeling techniques. For this project, the house was meticulously prepared to prevent the paint from peeling or falling off. We used a special exterior latex paint, ideal for aluminum siding. Additionally, we completely replaced the front railings and demolished a small side porch. The paint was applied using a spray technique to ensure uniform coverage and adequate penetration in the siding joints. This work took 15 days to complete. AfterBefore Main Points of the Work Done: Complete preparation of the house. Application of latex paint for aluminum siding. Replacement of front railings. Demolition of a small side porch. Use of spray for uniform coverage. Work completed in 15 days. Components and Tools Used In this project, we used a special exterior latex paint designed to effectively adhere to aluminum siding. High-pressure sprays were employed to ensure uniform coverage and deep penetration in the siding joints. The new railings were chosen for their strength and durability, and demolition equipment was used to safely and efficiently remove the side porch. Rockville blue (5) Rockville blue (3) Rockville blue (7) Rockville blue (8) Rockville blue (2) Rockville blue (4) Rockville blue (6) Rockville blue (10) Rockville blue (11) Load More End of Content. Components and Their Implementations Key components used include a specialized exterior latex paint, ideal for aluminum siding. High-pressure sprays allowed for a uniform and effective application, enhancing the paint’s durability and appearance. The newly installed railings not only provide safety but also a significant aesthetic improvement. The demolition of the side porch was carried out with appropriate tools to ensure a safe and clean process. Safety Steps and Devices The process began with thorough preparation of the house, ensuring the surface was ready for paint application. Appropriate safety devices were used for the demolition of the side porch, minimizing any risk. The spray painting was performed following strict safety standards to protect both workers and the property. Finally, each installed component was checked to meet quality and safety standards, ensuring a durable and aesthetically pleasing result.
Expert Bathroom Remodeling in Bethesda, MD
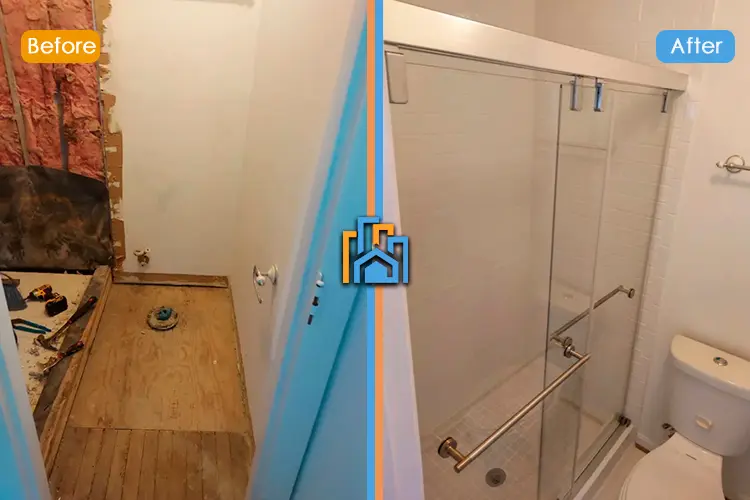
We transformed your basement bathroom in Bethesda with a comprehensive approach, ensuring a long-lasting and high-quality renovation. Our team takes care of every detail, from waterproofing to installing new fixtures, to provide you with a functional and aesthetically pleasing space. Work Done in the Basement Bathroom In this basement bathroom, which had leakage problems and loose tiles, we carried out a complete renovation. The floor was waterproofed with a shower liner and a cement mortar was applied to install new tiles. The faucet was replaced and a sliding door was installed for the shower. Durarock was used on the bathroom walls, and the same tile as the shower was placed on the bathroom floor. Main Points of the Work Done: Waterproofing the floor with a shower liner. Applying cement mortar for the tiles. Replacing the faucet. Installing a sliding door for the shower. Using durarock on the bathroom walls. Installing new tiles on the bathroom floor. Components and Tools Used The bathroom remodeling utilized high-quality materials and tools to ensure durability and functionality. A shower liner was used for waterproofing, providing a robust barrier against moisture. Cement mortar was applied to secure the tiles firmly in place. For the walls, durarock was chosen for its moisture-resistant properties. A new sliding shower door was installed to enhance accessibility and style. Bathroom in Bethesda (9) Bathroom in Bethesda (10) Bathroom in Bethesda (7) Bathroom in Bethesda (3) Bathroom in Bethesda (4) Bathroom in Bethesda (5) Load More End of Content. Components and Their Implementations The components used in this project were selected for their durability and performance. The shower liner ensured effective waterproofing, preventing future leaks. Cement mortar provided a solid base for the new tiles, ensuring they stay in place. Durarock was used on the walls for its superior moisture resistance. The new sliding shower door added a modern touch and improved accessibility. Safety Steps and Devices Ensuring safety and compliance with standards was paramount in this project. The waterproofing process with the shower liner was meticulously carried out to prevent any future leaks. Proper installation of the cement mortar and tiles ensured a stable and secure surface. The use of durarock on the walls provided added protection against moisture. Additionally, all installations were checked thoroughly to ensure they met safety and quality standards.

Comprehensive Kitchen Remodeling Services in Silver Spring MD
At Cacheiro Painting and Remodeling LLC, we excel in transforming kitchens. Our latest project in Silver Spring, MD, showcases our expertise in expanding and modernizing spaces to meet our clients’ needs. The Project in Silver Spring n this project, we completely remodeled a kitchen in Silver Spring, MD. At the request of the new owner, we removed a bearing wall to expand the kitchen and create more space. We relocated the refrigerator and created a larger pantry for storing merchandise. The wall we removed contained air conductors and plumbing, which we relocated. Due to the narrow location, we used PEX A for the hot and cold water supply, a flexible and highly cold-resistant material. Additionally, we installed a new HVAC system in the attic to supply the second-floor rooms. The kitchen features a quartz countertop, white cabinets with 4″ brushed nickel handles, and water-resistant LVT flooring. AfterBefore Main Tasks: Demolition: Removing the bearing wall and old fixtures. Plumbing Installation: Relocating and installing new plumbing with PEX A. HVAC Installation: Adding a new system to the attic. Drywall Installation: Ensuring smooth and clean surfaces. Painting: Applying a fresh coat for a new look. Cabinet Installation: Setting up new white cabinets. Countertop Installation: Installing a quartz countertop. Hardware Installation: Adding 4″ brushed nickel handles. Appliance Installation: Setting up General Electric appliances. Final Inspection: Ensuring everything meets county standards. Components and Tools Used For this kitchen remodel, we employed top-quality materials and tools. PEX A was used for the plumbing due to its flexibility and resistance to cold, ideal for the narrow locations and the pipes running through the garage floor. The new HVAC system was strategically placed in the attic to ensure efficient heating and cooling for the second floor. Quartz was chosen for the countertops, providing durability and a sleek appearance. The cabinets were fitted with 4″ brushed nickel handles, adding a modern touch, while water-resistant LVT flooring was installed for longevity and easy maintenance. Kitchen Silver Spring MD1 Kitchen Silver Spring MD2 Kitchen Silver Spring MD3 Kitchen Silver Spring MD4 Kitchen Silver Spring MD5 Kitchen Silver Spring MD6 Kitchen Silver Spring MD7 Kitchen Silver Spring MD8 Kitchen Silver Spring MD9 Load More End of Content. Safety Measures and Steps Throughout the remodeling process, we adhered to stringent safety protocols. We started with a thorough demolition, carefully removing the bearing wall and old fixtures. We checked all existing pipes for leaks before installing the new plumbing system. County inspections were conducted to ensure compliance with all regulations. Drywall was meticulously installed and painted. Cabinets and countertops were then fitted, followed by the installation of all hardware and General Electric appliances. Finally, a comprehensive county inspection was performed to ensure the highest quality and safety standards were met, completing the project successfully on June 4, 2023.